
How to Add a Rotatable 3D Product Model to Your Website with model-viewer
One HTML tag is enough to place a GLB file on a page. Here is what the file needs, which attributes matter, and how to keep the page fast, accessible and honest on real devices.
Why put a 3D model on a product page?
A photograph shows a product from the angles the photographer chose. A rotatable model lets the visitor look from the angle they care about. That matters most for products with colour options, several parts, or a scale that is hard to judge from a flat image. A buyer for a gym, a hotel or a showroom often wants to see the back, the underside or the join between two materials before writing to you.
This guide describes the shortest route that works: Google's open-source model-viewer web component and a model saved as a GLB file. It is written for brand owners, e-commerce teams and developers who need to decide what to prepare, where to place the viewer and what to test before launch. If you are still deciding between photography and 3D, product photography versus 3D render for e-commerce sets out where each one fits.
Start with the file: why GLB?
GLB is the single-file, binary form of glTF. Geometry, materials and textures travel together in one file, and browsers can read it directly, which is why model-viewer expects it. Other formats such as FBX or OBJ are common in production, but they are not what you want to serve to a website visitor.
The format is only half of the story. A GLB made for a render can still be far too heavy for a web page, because render models tend to carry dense geometry and very large textures. If you want the background on the format itself, GLB file format explained for web 3D covers what is inside the file and why it suits the web. If you have not yet commissioned a model, what is 3D product modelling explains what the work involves and what you should receive.
The shortest working example
The snippet below turns a GLB file into a rotatable viewer. The script address and version number change over time, so please check the current model-viewer documentation for the recommended way to load it before you copy anything into production.
<script type="module"
  src="https://ajax.googleapis.com/ajax/libs/model-viewer/4.0.0/model-viewer.min.js"></script>

<model-viewer
  src="/models/product.glb"
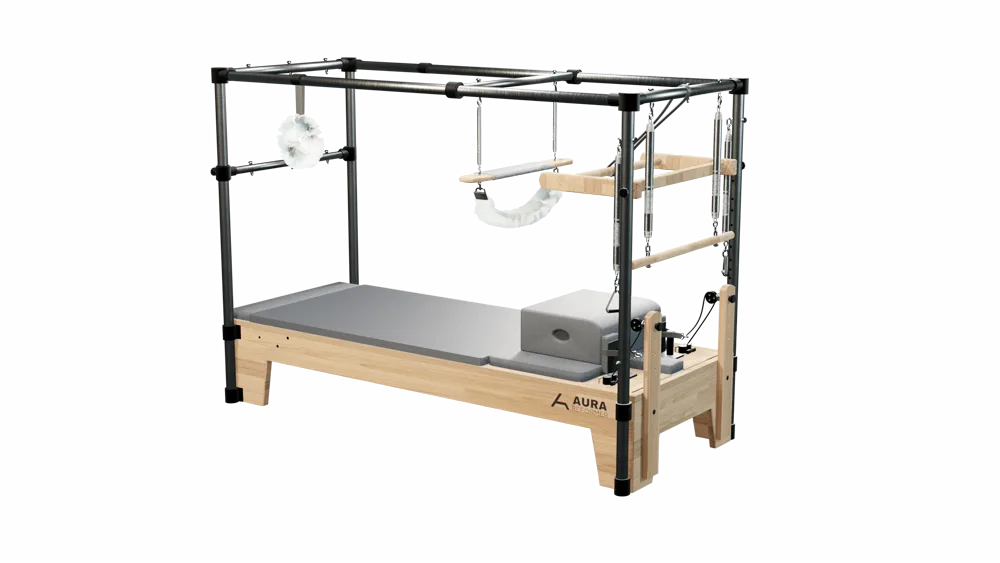
  alt="3D model of a wooden-framed reformer with a leather cushion"
  camera-controls
  auto-rotate
  shadow-intensity="1"
  style="width:100%;height:480px">
</model-viewer>
That is the whole integration for a basic viewer: one script, one element. The element needs an explicit height, otherwise it may collapse to nothing, and the model path must be reachable from the page. Everything else in this guide is about making that small piece of code behave well on a real shop page.
The attributes worth knowing
You do not need many attributes to get a good result. These are the ones I would look at first, and the current documentation lists the full set and any changes.
- src: the address of the GLB file.
- alt: a text description of the model for screen readers and for anyone who cannot see the viewer. Never leave it empty.
- camera-controls: lets the visitor drag to rotate and zoom in.
- auto-rotate: a slow turn before the visitor touches the model. Consider switching it off for people who prefer reduced motion.
- poster: an image shown while the model loads. It changes the first impression more than almost any other setting.
- loading and reveal: control when the model starts loading and when it appears, so that a viewer lower on the page does not compete with content the visitor sees first.
- shadow-intensity, exposure and environment-image: control the grounding shadow, overall brightness and the lighting environment.
- ar: offers an augmented reality view on supported devices.
Prepare the model for the web, not for the render
A model that looks excellent in a render can still make a poor web experience. A render is calculated once and saved as an image. A web model is drawn again on every visitor's device, every time they touch it. The cost is paid by the visitor's phone and connection, not by your computer.
Four things decide how heavy a web model is: the number of polygons, the size and number of textures, the number of materials and the number of separate objects. Textures usually account for most of the file size, so they are the first place to look. Many products are well served by textures between 1024 and 2048 pixels, though the right size depends on how large the product appears on screen and how close visitors can zoom.
Materials matter for a different reason. Each one can add drawing work, so parts that share the same surface can often share a material. The exception is anything the visitor can change, such as a colour or finish. Those parts need their own material, or you cannot recolour them independently.
Plan this before modelling begins. Ask where the viewer will sit, how large it will be, how close visitors can zoom and which devices you need to support. Those answers set the budget. Discovering them afterwards means shrinking a finished model, which usually costs time and quality. The price implications of these choices are explained in 3D product modelling cost: what affects the price.
Exporting from Blender to GLB
Many models reach the web from Blender, so a few export habits are worth sharing. Use File, Export, glTF 2.0 and choose the binary GLB format. Before exporting, apply object scale and rotation so the model does not arrive at an unexpected size or orientation. Exporting only the selected objects keeps cameras, lights and stray scene items out of the file.
Materials built with the Principled BSDF node carry over to glTF as standard PBR materials. Not every Blender node setup translates directly, however. Procedural textures and complex node networks usually need to be baked into image textures first.
Then open the exported file in an actual web viewer. Do not trust the preview inside your 3D software, because lighting and materials can look different in the browser. Turn the model through every angle and look for missing faces, flipped surfaces, flickering areas and a wrong starting orientation.
Poster images and the loading experience
While the GLB downloads, the visitor should see something useful rather than an empty box. The poster attribute lets you show a still image of the product, ideally a clean render from the best angle, until the model is ready. The page then looks complete immediately, and the model becomes interactive when it has loaded.
A progress indicator also helps, because a visible bar makes waiting feel shorter. If a page contains several viewers, only the ones near the screen should load. That keeps the first view of the page quick for everyone.
Adding a colour option
Because model-viewer exposes the model's materials to JavaScript, you can change a base colour without producing a new image for every variant. The example below changes the first material when a button is clicked. Which material you should change depends on your model, so list the material names in the browser console after loading and choose the correct one. As before, please check the current documentation for the exact API, since it can change.
<model-viewer id="product" src="/models/product.glb"
  alt="Product model with selectable colours" camera-controls></model-viewer>

<button data-colour="#8c1d2b">Burgundy</button>
<button data-colour="#1d2f5a">Navy</button>

<script>
  const viewer = document.querySelector('#product');
  viewer.addEventListener('load', () => {
    const material = viewer.model.materials[0];
    document.querySelectorAll('[data-colour]').forEach((button) => {
      button.addEventListener('click', () => {
        material.pbrMetallicRoughness.setBaseColorFactor(button.dataset.colour);
      });
    });
  });
</script>
The same idea scales up. A real configurator can group colours, let the visitor choose per part and show only the options that are actually available. The Aura Reformer work is an example: a set of 6 Pilates equipment products shown in a web viewer, with a 3D colour picker offering 57 colours, made up of 20 Aspendos, 29 Harşena and 8 Toskanto felt options. You can see it on the Aura Reformer project page, and the thinking behind it is described in 3D colour configurator for products: Aura Reformer.
One caution applies to any colour picker. A colour on a screen is not a physical sample. If your customers make decisions from the colours they see, compare the digital values with real material samples and tell visitors that screens differ.
Keeping the page fast
A few habits protect the loading speed of the whole page.
- Keep the GLB as small as you reasonably can. A few megabytes is a sensible target for a single product, although the right figure depends on your audience and connection speeds.
- Do not make textures larger than the product's size on screen justifies.
- Prefer one viewer that swaps models on demand over many viewers loading at once.
- Use a poster image and delay loading until the viewer is close to the screen.
- Consider a lighter model for phones if your product is complex.
Measure the page before and after adding 3D. If the first load becomes noticeably slower, reduce the file, defer the viewer or load it only after the visitor asks for it.
Mobile and touch
On a touchscreen, scrolling the page and rotating the model compete for the same gesture. If the viewer fills the screen, a visitor can get trapped inside it while trying to scroll. Avoid making the viewer full height on phones, or add an activate button that enables rotation only when tapped. Keep touch targets for colour buttons comfortably large, around 44 pixels is a common guideline, and limit the viewer's height so the surrounding page stays reachable.
Test on at least one Android phone and one iPhone, not only on a development computer. Watch the first load, how smoothly the model turns, how zooming feels and whether the viewer interferes with scrolling. Network throttling in the browser's developer tools is a useful way to approximate a slow connection.
Accessibility and search
A 3D viewer should not be usable only with a mouse or a finger. Write the alt text so it explains what the product is. Check that the viewer can receive keyboard focus and that rotation works from the keyboard. Turn off automatic rotation for visitors who have asked their device for reduced motion. Give the key product information, such as dimensions, materials and colour options, as ordinary text on the page as well.
That text also matters for search. Search engines cannot read the contents of a 3D model, so the words around it carry the meaning. Add a real product description, clear headings, a meaningful poster image with its own alt text and, where it suits your shop, structured product data. The 3D model strengthens the page but does not replace the writing.
When the model does not appear
Most problems come from a short list of causes.
- The browser console shows a file path error. Check that the path is correct and that the file is actually on the server.
- The page was opened directly from the local file system. Browsers usually require the file to be served by a web server.
- The model is far too large or too small. Scale may not have been applied before export.
- The model looks completely black. Add lighting through an environment image or adjust exposure.
- Textures are missing. Check that they are embedded in the GLB and not too large.
- One device struggles while others work. Try a lighter model and smaller textures.
Planning the integration on a live shop
For an existing product page, a calm sequence works well. Prepare the model and poster and test them on a standalone page first. Then decide where the viewer belongs: often inside the product gallery, as another tab beside the photographs. Match its proportions to the layout so the model is not cropped, and limit its height on mobile.
Design the failure state as well. If the model cannot load, the visitor should still see the poster and the product photographs. That way the viewer is an improvement and not a single point of failure. On a slow connection or in a data-saving mode, you can offer a button that loads the 3D view on request instead of loading it automatically.
When the product changes, update the model too. Name files with a version, such as product-v2.glb, and publish new versions under new names so cached copies do not show the old design. Keep the old files in an archive so you can go back if you need to.
When model-viewer is not the right tool
model-viewer is a quick, dependable start, and for rotating, zooming and recolouring a product it is often all you need. If your project needs custom animation between parts, complex scene logic or several interacting objects, a general 3D library such as Three.js gives more control, at the cost of more code and more maintenance. A useful question is whether the page needs a product viewer or a bespoke experience. The first points to a ready-made component, the second to custom development.
If you do not have a web-ready model yet, it can be built from product photographs and measurements. Pricing depends on the product and the scope, and you are welcome to request a quote with your product details.
Frequently asked questions
Do I need to know how to code to show a 3D model on my website?
For a basic viewer, a script and one HTML element are enough. A colour picker, custom controls or hotspots need some JavaScript, or a developer who can add it.
Will a 3D model slow down my page?
It can if the file is large. Compressing the model, reducing texture sizes, using a poster image and delaying the load usually keep the effect small, but you should measure your own page before and after.
Can the same model be used for augmented reality?
Often yes. model-viewer offers an ar attribute, and platform requirements such as the file type for Apple devices can differ, so check the current documentation and test on real phones.
What should I do if the model looks black or flat?
Lighting is the usual cause. Try an environment image, adjust the exposure, and check that the material settings survived the export.
Is model-viewer enough for a colour configurator?
For a single product with a handful of colour options, usually yes. For a large range of parts and finishes, plan the materials carefully and consider whether a more custom setup is justified.
Conclusion
model-viewer is one of the lowest-effort ways to bring 3D to a product page: a GLB file, one element and a few attributes. The real work is in preparing the file: sensible scale, a restrained polygon count, efficient textures, a good poster and clear text around the viewer. Get those right and visitors can inspect the product quickly on almost any device. If you would like a web-ready model for your own range, send your details through the request a quote page or start with what is 3D product modelling.
Have a product in mind? Send photos, dimensions or drawings and get a project quote.
Request a quote